Monday, May 23, 2016

Healthy Oatmeal Banana Breakfast "Cookies"

We're kicking our butts in gear this month by doing another round of Whole30. Over the past few months, it's been one holiday after another (Valentine's, Easter, Tom's birthday, Maddie's birthday) and our junk food consumption has been at an all-time high. We're currently on Day 20 and still hanging in there.

In "real life" Maddie eats the same things we eat, but cutting out bread/grains and dairy for a healthy growing toddler doesn't sound like a great idea to me. Especially when she weighs in at a mere 24lbs (10th percentile, but get this, she's in the 88th percentile for height)! With the amount of energy she has, I figure she needs every carb and calorie available to her. I'd say she still eats about 75% the same things as us on Whole30, but then I'll also make her something else I know she'll eat - grilled cheese, mac and cheese, chicken nuggets, etc. in case she isn't really into whatever new dish we're trying. The main change for her has been cutting out all sugary processed foods. Goodbye fruit snacks, marshmallows, and chocolate teddy grahams!

For over a year now, I've been making Maddie oatmeal banana "cookies" for breakfast and snacks. They are NOT Whole30 because of the oatmeal and vanilla extract, but they are delicious! When we're not doing Whole30, I like to make a batch, eat some fresh out of the oven, put a few in the fridge, and freeze the rest to use over the next couple weeks. I've tested several recipes and combined my favorite parts into the cookies I make now. When I first started, I would smooth the batter into one giant piece on a baking sheet and then cut it into bars after it baked. I soon realized that was more effort than necessary, because I could more easily just spoon the batter into individual cookies and voila!

Without further ado, here's the recipe:

Healthy Oatmeal Banana Breakfast "Cookies"
Prep time 10 mins
Cook time 15 mins
Makes 16-20 small cookies (or 15 large cookies)

Ingredients
3 tablespoon coconut oil, softened
2-3 bananas, mashed
1 teaspoon vanilla extract
½ teaspoon cinnamon
¼ teaspoon ginger
¼ teaspoon nutmeg
2 cups quick cook oats
¼ cup apple sauce
Handful of blueberries or raisins

Preparation
1. Preheat oven to 350 degrees and line baking sheet with parchment paper.
2. In a large bowl, combine the coconut oil and mashed bananas. If your coconut oil is really solid, microwave it for a few seconds until it is soft, then add the bananas and mash.
3. Add the vanilla extract, cinnamon, ginger and nutmeg. Stir until combined.
4. Stir in the oats and apple sauce, mixing until all of the oats are moist.
5. Fold in a handful of blueberries or raisins.
6. Scoop like cookies onto baking sheet, flattening to about ¼-½ inch thick. The cookies will not rise or spread so you can place them close together.
7. Bake at 350 degrees for 12 minutes for soft cookies or 15 minutes for slightly crispy edges.

Note that the cookies do not have any added sugar, and therefore aren't super sweet. Luckily Maddie doesn't know that I'm fooling her by calling them cookies ;) The riper your bananas, the sweeter your cookies. I suppose you could use sugar-added applesauce too but I haven't tried it. Adding raisins or cranberries will make them sweeter too, but be careful, some dried fruits have a lot of added sugar. Sometimes I'll add sunflower seeds to give them some crunch. And for a special treat, I once swapped the fruit for chocolate chips!

Per usual, I have some awesome (read: terrible) old iphone photos to share with you. These seem to raise a few questions. Why is Maddie stirring with forks while sitting on the counter? and why would I put my mixing bowl on the stovetop? We may never know. Live and learn, folks.


Saturday, May 21, 2016

IKEA Play Kitchen "Remodel"

A few months ago, we "hacked" an IKEA stool to make a toddler learning tower. I use term "we" very loosely. My idea, Tom's hard work. So you can just imagine how excited he was when I mentioned my idea to "remodel" an IKEA play kitchen for Maddie's 2nd birthdaySame story, different project.

The IKEA DUKTIG kitchen is super cute as is without any updating. Very simple and realistic. After accumulating many pink and purple toys in the first two years, we've started to realize maybe we should shoot for gender-neutral just in case we have a future son. I wanted to spice up her kitchen, but not make it too super girly. Here's the "before":

DUKTIG Play kitchen IKEA Encourages role play which helps children to develop social skills by imitating grown-ups and inventing their own roles.

And here's the after, with details on our additions:


Pardon the terrible lighting in the photos below. We stored the kitchen in the garage while it was a work-in-progress and set it all up the night before her birthday after she went to bed. The kitchen has never (and will never) looked this tidy again, so I wanted to snap the photos before Chef Maddie came through the next morning.

1) Microwave turn table: made from 3" wooden disc from craft store and screw/washer/locking nut to make it spin. It was pretty plain looking so I traced a silver circle on the top to give it some fake dimension.


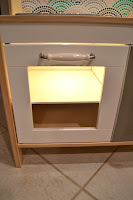
2) LED track lighting in microwave, above counter, and in oven. We used an IKEA DIODER 4 piece strip set. My favorite part about it is the little light switch. Maddie loves to turn the lights on and off!
 

3) Backsplash: we used a piece of MDF wood trimmed to size and covered it in wrapping paper from IKEA.

4) Drawer pulls: I love love love the style of these IKEA HISHULT drawer pulls. They came in a set of two, so I used them on the "oven" and "cabinet" doors of the play kitchen.


5) Painted cabinet door and shelf backing in top section. Pretty self explanatory :)

6) Added a hook to hang aprons.


7) Painted side panel with chalkboard paint.


I really love the way it turned out. It was the cutest thing when she came downstairs on her birthday, unwrapped it, and proceeded to check out every little detail. It's such a joy to see her pretending in her kitchen, making "eggs" for her baby dolls, and pretend washing her dishes. The kitchen comes with attachments to put on the legs to make it taller, so I know this is a toy that will grow with her through the years. 


Wednesday, May 18, 2016

Maddie's "Pink Lemonade" 2nd Birthday Party

We recently celebrated Maddie's 2nd birthday, and it was so much fun! She totally understood the excitement around turning 2, seeing her friends/family, eating cake, and opening presents. Her happiness was contagious and we had the best afternoon celebrating her.


We went with a Pink Lemonade themed party this year. Truthfully, I decided on it last year when I was brainstorming ways to re-use the fruit stand Tom built. But fortunately, Maddie loves the color yellow and lemonade, so it was perfect match. I figure my time is limited before she has a real opinion on her party themes, so I made the decision and ran with it this year.

This was the DIY invitation I made:


And a few of my favorite decorations:


I made these party favors and had guests grab a lemon from one of our many lemon baskets before they left (well, at least, that was the plan... I forgot all about these until half of our guests were already gone):
  

The weather was warm, but the crowd toughed it out:
     

Maddie loved [the frosting on] her cupcake:
   

She also loved her many gifts:
    

It was such a joy to celebrate our happy girl with our amazing friends and family.